🛡️ Protect your paint, flaunt your ride—because flawless is the new flex!
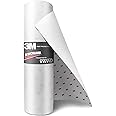
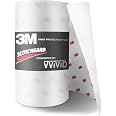
3M Scotchgard Clear Paint Protection Film is a durable, 8mil thick polyurethane film designed to shield your vehicle’s paint from chips and road damage. Measuring 12-by-72 inches, this universal-fit bulk roll offers customizable coverage with a virtually invisible finish. Easy to install with online instructions, it helps maintain your car’s pristine look longer, making it a must-have for any discerning car owner.


| Brand | 3M |
| Size | 12-by-72-inches |
| Color | Clear |
| Item Thickness | 0.01 Inches |
| Automotive Fit Type | Universal Fit |
| Manufacturer | 3M |
| UPC | 746367806311 |
| Item Weight | 7.4 ounces |
| Package Dimensions | 12.05 x 1.65 x 1.46 inches |
| Item model number | BULK1272 |
| Is Discontinued By Manufacturer | No |
| Manufacturer Part Number | 25010 |
M**N
Nice and clear
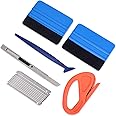
I used this film to protect my brand new headlamp assemblies. I've little to no experience with other products of this type and considering this was my second wrap ever it came out quite good. Adhesion does seem a bit weaker than I'd like (only factors when rounding corners with short overhangs), but then maybe that's the norm or I'm just not experienced enough. Either way I do not regret the purchase and my headlights are clear & protected.Used a 20floz distilled water + a drop of dish wash soap mix with judicial spray of both surfaces. Be careful when squeezing out the remnant small bubbles, the film may get blemished (hazed) when applying too much pressure with the squeegee tool.
T**Y
Protect my headlight from yellowing again
I use this for protecting our headlights from yellowing again and it worked great. It is easy to use. First, I restore headlights with HF headlight restoration kits. Then, I spray a little bit of a solution (water and alcohol) onto them and began to apply. The adhesion is strong and the size is good for one vehicle. It provides clear appearance, great scratch resistance and good protection from sunlight UV (it is 12 months now and my headlights are still same as just being restored).
A**5
E-Ray install - Up for a challenge 🥲?
I installed protective film on the front of my 2024 E-Ray Corvette, primarily covering the hood with a larger 12x72 piece. To ensure a more precise fit, I used tracing methods to prepare sections before applying the film. Installing larger pieces can be challenging, especially for first-time installers—I ended up wasting about $20 worth of film on my first attempt.To prevent the film from folding or sticking prematurely, always spray it (and the car both) with a solution before positioning it on the paint. While online tutorials are helpful, hands-on experience is the best way to master the technique. Practicing on an older vehicle first can help you get comfortable with the process.Overall, the installation was more time-consuming than anticipated, and I’ve decided not to do my own installations in the future. However, I did save approximately $1,000 compared to having a professional perform a partial front installation, which typically costs around $300 in materials using 3M film rolls.For full-hood coverage, I'm ordering a pre-cut piece to install.
B**H
Patience and planning are key!
I use this film on all my cars where I want good protection. It's good for high traffic areas on the car or to protect nice paint on older cars. The key to making it fit right is patience and planning! The film isn't perfect, it will look shiny, but sort of like orange peel surface. It is also not perfectly clear, it has the slightest yellow tint to it. Only really noticeable on a super white car. Overall I really like the film, kinda pricey for the large sheets though would be my only complaint.I used this particular film to do my 1992 Miata front bumper. It's full of curves and very difficult to wrap. If you've got a very difficult surface plan ahead before peeling the paper off, winging it isn't going to work. What I have found that works best is to unroll the film, tape it to the car with masking tape, then plan how to cut it. I had to cut the film in three pieces to fit the bumper. Make sure you have plenty of overhang around the edges. Pick only one edge of the panel you want to follow. Plan to hide your mistakes behind lenses or fog lamps so you don't require a perfect fit. It'll never be perfect, you'll just get better at hiding your sins.Once you're happy with the layout, spray some soapy water on a large flat prep surface (like your hood). Flip the material over so film side is touching the prep surface, begin peeling the backing off while spraying soapy water on the adhesive side of the film. After the backing paper is removed liberally apply soapy water to the surface that will get the film. Remove the film from the prep surface and carefully flip so the adhesive side is now touching the surface. Spray soapy water on the film and work from the center outwards with a squeegee. The soapy water helps to move the film on the surface and will lubricate your squeegee so it doesn't dig or gouge the film.Be patient in positioning and squeegeeing the surface. Once the film begins to stick to the surface take a microfiber towel to remove water and massage the film. If you have trouble spots, you can use some masking tape to tension the film as it sets up.After the film has begun to set you can wrap corners and trickery areas that won't stay put with the water.Main take away is be patient! Don't expect you can wrap an entire bumper with a single sheet,
Trustpilot
3 weeks ago
2 weeks ago