
DOWNLOAD THE APP


Customer Services
Copyright © 2025 Desertcart Holdings Limited
DOWNLOAD THE APP


🖨️ Elevate your 3D prints with the build plate pros trust — stick, print, flex, repeat!
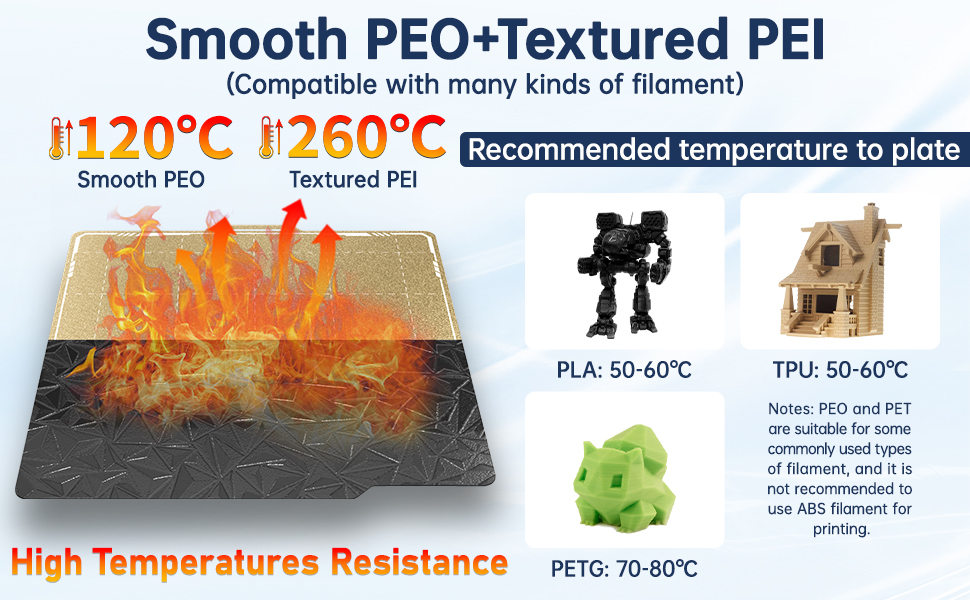
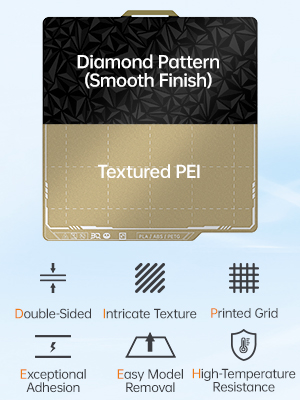
The BIQU Designer Series Build Plate is a premium double-sided PEI spring steel sheet (257x257mm) designed for Bambu-Lab 3D printers. Featuring a smooth PEO side and a textured PEI side, it offers versatile adhesion options with exceptional flatness and magnetic flexibility. Engineered for high-temperature stability and durability, it ensures reliable print adhesion and effortless removal, making it a must-have upgrade for professional-grade 3D printing.


| Customer Reviews | 4.3 out of 5 stars 995 Reviews |
L**R
Wanna Save Electricity and Have a Grippy Build Plate? Now you can have both.
After using this build plate almost exclusively for over 2 weeks, here are my honest impressions of the product. Simply put, it sticks really well and releases when you need it to. I attempted to run it through a gauntlet of different brands of filament and I couldn’t find one that did not stick well to this build plate. I print a lot of articulated dragons with Silk PLA and with certain build plates, I will have adhesion problems at times. As a person who hates using glue on my build plates, it was a very welcome sight to see that glue is not required on this particular one. Unboxing and Initial Impression Packaging is very straightforward in a cardboard box, inside you will find an information sheet comparing the Frostbite and Glacier build plates that are offered in the CryoGrip series. You will also find a sticker sheet that has the AR code stickers to affix on the build plate for the X1 Carbon to read the proper build plate settings in the slicer. The build plate does have a slightly textured surface but it feels smooth to the touch and feels high quality. The easiest way to describe the texture of this build plate is that it sits right between the Smooth plate and Textured PEI plate that Bambu Lab offers. It also features an enlarged heat-isolating handle on the front with holes to facilitate quick cooling and make the build plate a lot easier to remove from the printer. The information sheet also outlines the settings needed to properly use the build plate. I initially set my slicer to run 5º C cooler but then I increased it to 10º C cooler with no problems. This build plate can also work with all filaments that have a nozzle temperature below 300º C so most engineering filaments will be compatible with this build plate. But where it shines is with PLA and PETG. The Frostbite version is even better at cold printing adhesion than this one with PLA and PETG. The gauntlet test I tested this build plate with numerous filaments. My printer is a Bambu Lab P1S and below is a list of what filaments I used. * Bambu Lab PLA Basic * Bambu Lab PLA Matte * Bambu Lab PLA Metal * Bambu Lab PLA Marble * Bambu Lab PLA Galaxy * Bambu Lab PETG HF * Bambu Lab ABS * Anycubic Silk PLA Dual and Tri-Color * SUNLU Silk Rainbow PLA+ * Eryone Silk Tri-Color PLA * Flashforge Color Changeable PLA * Elegoo Silk PLA * Polymaker ABS As far as performance goes printing numerous articulating dragons and the Midgard Serpent pictured above, the silk PLAs from the different manufacturers did not have any adhesion problems as long as you go with the recommended speed for the initial layer. I did adjust the settings in the slicer to utilize the new Bambu Cool Plate Super tack although the information sheet recommends the Cool Plate settings. I also adjusted the temperature manually to be 5-10º cooler because the information sheet recommends 45-55º C for PLA and 60-75º C for PETG and the recommended manufacturer temps for the ABS. As time progresses I will try other filaments like PA, TPU, and ASA. I would also like to mention that for the 2 weeks I was testing, the build plate was not cleaned at all which is a testament to the stickiness of this build plate. BiQU recommends soap & water for cleanup or even alcohol if you are printing PETG. With that being said, the build plate is so sticky that it can withstand an overnight power outage and resume in the morning with no problems on a cold PNW night. I am quite happy with that indeed. Energy savings with this build plate is going to be significant if you are running a printer farm and running everything 5-10º cooler as a whole. I did not test my particular energy savings on a meter but I am sure it will add up over time. Final Thoughts What can I say, BiQU did a great job with this plate and only time will tell if it is just as durable as the Bambu Lab build plates. If you keep it clean, it should stay very sticky and last a while in a heavy printing environment. My printers stayed running 24 hours a day for 2 weeks straight so it was thoroughly run through its paces. I like the overall texture as it leaves a very smooth finish on my builds and not too shiny. With all of my prints both large and small, I only encountered one problem with adhesion and its because I was printing with ABS and left the top of the printer open accidentally so it was a little too cool in the chamber and the large print warped and came off in one corner. Other than that no problems with adhesion. I give this product 5 stars for quality, performance, and value.
N**D
best plate you can buy
This is probably the best plate you can buy for your 3D printer. Unless you're looking to have a nice pattern on the bottom of your prints, stop here, buy this, and thank yourself. I have not had a single print fail (due to adhesion) since switching. It fits just like the standard plates, and just... works. Very easy to get the prints off as well (though they don't just fall off, they do like to stick, but bending the plate will get things off pretty easily). I would highly recommend this plate for anyone having any issues with adhesion. 45 degree bed temp set, and just click "print" and walk away. No more checking the base layers, no more scrub daddy on your plate every couple prints. I do wipe mine down with a microfiber cloth between prints, but that's just me. You probably don't need that.
P**I
Great adhesion
Worth every penny for elegoo centauri carbon, stock plates have a lot of adhesion issues. This plate works flawlessly and sometimes can have too much adhesion, which isn’t a bad thing as long as you use a scraper properly to lift the print off without digging into the plate. Hit it with some alcohol and you’re good to go. One note is that these plates are slightly smaller then the original plates, but it doesn’t really matter if you aren’t printing from corner to corner.
T**M
So perfectly sticky for my P1S, the best upgrade I've done to date!
I was going through a nightmare of nothing sticking for the past week on my bambu p1s days and I tried everything!! (I used different sides my PEI plate, I tried alcohol, I washed it a bunch of times and nothing worked... I tried all sorts of temperatures speeds and even first layer density and flow, absolutely nothing)! So I gave up and bought this cryogrip plate and it is ridiculous! They say you are not supposed to use alcohol so I just use soap and warm water and this thing sticks so perfectly, the only thing is you can't detach when it's warm so you need to let it cool down before you detach, but now that I've dialed it in it prints perfectly every time! It's crazy, and it's nice because it's a low temperature plate so I print PLA at 40° and pet g at 55° and I don't get any heat warping or creep, I love this thing!
A**B
Works well and the recommended bed temps are legit, but it is a little pricey.
This build plate is really worth it in the electricity and gluestick savings alone - PLA: I've consistenty printed at 35C first layer, then let it drop to 30C after that. I tried it at 30C first but was seeing some slight warping near the edges of the build plate for larger prints. It keeps the chamber temp under 35C, which keeps that loud back fan off. - PETG: I am printing this at 55C. I tried it at 50C first and also saw some warping, so 55C I've had better results. This is with (in most cases) no glue. I was using gluestick at first out of precaution, but this is fine to print on without it, just let the bed cool down first after the print. For larger prints, just sliding the plate out and flexing it as you bring it out will get your part off easily (PETG and PLA). I've tried it with all kinds of brands of PLA and PETG and the results have been consistent. I haven't tried it with any other filament types since it's mainly made to reduce bed temp requirements for these 2. Some cons: I've had some problems with smaller support layers (PLA) and smaller item prints sticking real well to the bed, and needing some work to come off. I'd recommend if you're printing smaller prints, use some light gluestick to help, or go back to the textured PEI plate that comes with the K2 Plus. Outside of that issue (minor), I love this plate and it's my go to for most prints. The only other nitpick is that the surface is smooth. If you want that textured look and feel for your prints, this won't do it. Hopefully they come out with a textured version. Overall I definitely recommend the plate, but it is a little pricey.
M**.
Great plate
This is a great plate. I have been using it on the P2S. Stickiness 10/10. Quality 10/10. The only issue I have is the detection of the plate is an issue even after setting the QR code that comes in the package. The Bambu P2S printer shows as warning with the issue detecting the maker. Update: 14 days later. I have contacted the seller. I am having problems with the plate. I used to print PLA with the default plate and I purchased this one to start with PETG. PETG is not longer sticking to the plate and I am having problems with the first layer.
R**T
Just get the Bambu Labs one if you don't wanna fiddle with things.
Still knocking two stars off this product due to the stickers not working with my P2S and it not performing correctly out of the box. Review Update: This is for anyone having issues with the first layer. Bambu actually specifies how to manually adjust Z offset in the P2S wiki but not the A1 wiki. I started at 0.0 and ended up at 0.03 for my A1. You will need to add the following lines, this will use that height for all other plates besides Textured PEI. (See picture) {else} G29.1 Z{XXX} I imagine you can add multiple plates to this list though I am not sure of the code you would need between the lines, need too look into that. Now that I actually have a proper first layer I will say, this plate does grip exceptionally well for only being at 35c for PLA. I have not tried PETG on it, will update if needed once I do. Original Review: Picked it up for the P2S, installed the recommended Cool Plate code and snapped it on the heat bed. Selected the cool plate super tack (only one available for the P2S) in Bambu Studio and send the print off. A few minutes in I get a 'build plate incorrect error', tried a few times with no luck and just went back to the stock PEI plate. Decided to try it on the A1, sliced a simple print and selected Cool Plate in Bambu Studio, sliced and sent off to printer. Checked it a few minutes in and the first layer is absolute garbage. I bought this plate because it is often touted as better than BL's plates. My experience was not that, I do not want to have to build custom profile for every filament I used or have to remember to change Z offset when I use this plate. On top of that the QR code sticker did not work so what's the point, What am I paying for exactly, a plate that doesn't do what it's advertised to and needs settings to be fiddled with?
R**.
Decent knockoff of Darkmoon3D's ICE plate (but still a knockoff)
This is a polyurea-based build plate, a clear clone of Darkmoon3D's ICE build plate. It's cheaper than the ICE plate, but that's because it's not as well built. As with many BIQU build plates, this plate is made with relatively thin steel. It arrives slightly warped, and will always have a curvature when not on a magnetic hotbed. Bambu's automatic bed leveling mesh deals with it just fine, but it's certainly disconcerting. The texture is also a bit rougher than the ICE plate. Performance, however, is the same. This plate is intended for PLA and PETG. Both stick to it VERY well. If you have problems with PETG lifting at the corners, this plate is your answer. You won't need brims with this plate—in fact, you need to turn brims off except in the most extreme circumstances, because (a) you won't need them and (b) it's very difficult to remove single-layer extrusions from this plate because of its strong adhesion. The plate generally needs only a wipe with a damp cloth. Isopropyl alcohol will permanently damage it. It's not for everything. The texture is far more prominent than, say, textured PEI. If you're looking for a smooth finish, this isn't the plate for you. If you're looking for a finish more like a textured PEI plate, and are willing to sacrifice some adhesion, the newer CryoGrip Pro Glacier plate may be better for you. If you want to print anything OTHER than PLA and PETG, this plate won't work. The plate has an ArUco code printed on it for a textured PEI plate. In terms of extrusion settings, this works. However, it needs far less bed heat than textured PEI plates. If you still use textured PEI plates alongside this plate, be prepared to create specific filament profiles with alternative hotbed settings for all your filaments when printed on this plate. (It's worth the effort.) If you can afford Darkmoon3D's ICE plate, it's better built and worth the money. If you can't afford it, or if it's not available when you need it, this plate is a decent alternative.
Trustpilot
1 month ago
2 months ago