🔥 Sizzle with Style: Your Ultimate Grill Press Awaits! 🔥
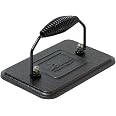
The LodgeLGP3 Rectangular Cast Iron Grill Press is a versatile kitchen tool designed for serious cooks. Measuring 6.75 inches by 4.5 inches, it features a cool-grip spiral handle for safety and comfort. This pre-seasoned press excels in heat retention and can be used on various cooking surfaces, including induction cooktops. Made from durable cast iron, it’s an eco-friendly choice, free from harmful chemicals.


| Color | Black |
| Is the item dishwasher safe? | No |
| Material Type | Cast Iron |
| Has Nonstick Coating | Yes |
| Product Care Instructions | Oven Safe, Hand Wash Only |
| Handle Material | Iron |
| Item Weight | 2.64 Pounds |
| Capacity | 3 Pounds |
| Compatible Devices | Smooth Surface Induction |
| Maximum Temperature | 100 Degrees Celsius |
| Is Oven Safe | Yes |
| Additional Features | Made without PFOA or PTFE |
B**E
A worthy uni-tasker (w/tips and recipes).
I have been on a cast iron craze lately. I have been collecting Lodge products, and eventually it came to this little uni-tasker. I waffled a bit....like I said, it is a uni-tasker. Some reviewers say they use it for other things like grilling chicken and such. But I was looking to straight up make paninis. In the end I just decided to go for the bull and get it. And boy am I glad I did! You have a few options in how you can use this item...the Lodge grill pan is the best since the ridges in the bottom of the pan match those on the panini press. However, if you don't mind too much if the bottom of your panini does not have ribs you can use a plain flat bottom skillet (make sure your skillet is big enough in diameter!) The third option is the one I am using at the moment, which is the Lodge pro 2 burner griddle. I use the ribbed side, which does not match the panini press (the ribs are narrower and spaced further apart) but accomplishes the general idea. I do plan on getting the ribbed grill pan at some point, but for now things work well this way.So, when the product arrived I gave it the usual 2 or 3 extra pre-seasonings using palm oil shortening in a 350 degree oven. Then it was time to get to work. I placed my pro 2 burner griddle on med. high heat (I have an electric stove, so used the 5 1/2 mark on the front and rear burner knobs) to pre-heat for about 10 minutes. I placed the panini press on a third burner to pre-heat by itself using the same setting, 5 1/2. Made up the panini using olive oil brushed on the outside of the bread, set it down on the griddle and (with a gloved hand!...don't forget the handle will get very hot!!!!!) waited about 3 minutes. The press stuck a bit to the bread on top a bit (I continue to have this minor issue, and I think it is not because of the seasoning lacking, but just the way the ribs kind of like to hold the bread a little bit), but I took a butter knife and used that to kinda just hold the bread lightly while I pulled out...pop, press came off just fine. Alas the bread on top was mildly toasted, but not browned (tasted just fine, and was like white toast, but definitely not what you expect from a panini). The bottom, however, was just fine, excellent, perfect in every way. This led me to believe the press was either not hot enough to begin with, or that I needed to compensate for the fact that the minute it goes on top it is losing heat where the pan underneath always has heat. So the next time I made a panini I pre-heated the bottom pan as normal (5 1/2 setting), but the press I heated to a higher temp (7 1/2). With 10 minutes of pre-heating it actually started to lightly smoke, so I could tell I had it much hotter. And sure enough this time the top and bottom came out an even dark brown. The actual process of grilling the panini only took about a minute and a half to two minutes. Dark, brown, delicious!So that is the biggest tip I can give. Pre-heat your panini press to a decent degree higher than your bottom pan.One other thing to note has to do with cheese. When using sliced cheese or at least a light amount of shredded you should have no problems. However, I made a panini today using a good mound of shredded cheese, and while the whole sandwich was warmed all the way through the cheese deep in the middle did not melt to that stringy, classic "grilled cheese" kind of consistency. So a little experimenting in that scenario may be needed.So here are some "recipes" (I hesitate to really say they are such since, well, it is just a grilled sandwich after all.) So far they have all been using homemade artesian bread from my Lodge dutch oven. It is a buttermilk, cheddar and herb bread that is proving awesome for paninis (and if anyone wants the recipe I can gladly post it here if they like along with instructions on how to make great bread in your dutch oven!) Actually, I must correct myself....one batch of panini were made on store bought, fresh made artesian sourdough (available from the bakery at Hannafords). Tasted good too, but the Buttermilk/cheddar/herb bread is better in my opinion.Turkey/Bacon/Cheddar/onion panini:Get some sliced turkey from the deli. Some nice sliced sharp cheddar. Cooked bacon slices. Sauté up some onions (by all means use raw onions, but onions sautéed in butter have such a wonderful sweet flavor and texture!) Take your bread slices (about 1/2" thick slices work best) and brush on some olive oil one side of both slices. Assemble your panini w/ olive oil sides facing out. Place on grill/pan, plop on the panini press and cooked to desired color on the bread is reached (should not take more than a few minutes) using the instructions/tips noted above in main review.Bacon/Cheese/onion panini:Take some bacon slices. Get a fine variety of shredded cheese. In this case I used cheddar, jack and a quesadilla cheese. Once again bring out my favorite style onion, the sautéed kind. To get the best results lay down half your cheese on the bottom slice, stack on your bacon, onions, and then the other half of your cheese followed by your final slice of bread. The cheese on both sides helps to "glue" everything together when all melted. From here on ditto above.Roast beef/mushroom/Cheddar panini:Pretty self explanatory. Get some sliced roast beef from your local deli. Sauté up some mushrooms (yeah, I know, sautéing vegetables adds more work...but trust me, it is WORTH it!). Sliced mild or sharp cheddar (I don't care much for swiss cheese, but I assume it would also make a nice substitution here). From here on ditto above.Some other ideas I am planning on trying at some point:Bacon/sun dried tomato (processed into a paste)/spinach/cheddarSautéed green pepper/sautéed onion/sautéed mushroom/cheddarItalian sausage/sautéed onion/sautéed pepper/mozzarella/marinara sauce
Y**7
This thing is heavy! And that’s why I like it!!!
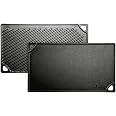
This review is for the 7.5” grill press.You need to accept that this is heavier than most other grill presses, even at this size. That weight comes in very handy when you’re trying to sear a steak, or when cooking a large package of bacon. It’s also great when you’re cooking sandwiches or making paninis, because you can easily get 1 - 2 underneath. Mexican food? Yep.For a single burger, it’s a bit overkill, but it definitely does the job well. I wouldn’t 2 at the same time for smashburgers, and you want to space out the patties due to the size of this thing.Now people will ask, “does it stick?”. It can, but that can happen with any press regardless of what it’s made of (don’t believe the marketing hype of some of the other brands). You’ll quickly learn that all you need to do is to put the press on the grill or griddle for about 2 minutes for the surface to heat up a bit and you’re good.“How hard do you need to press?” Not very. That’s the point of why this thing weighs close to 5lbs.Cleaning is a breeze. Sponge and water. One of those chainmail cleaners if things get gnarly.Yes, this is seasoned. And yes, you will see a spot where it looks like it’s worn or maybe even a little reddish. That’s normal and it’s from the manufacturing process. Nothing wrong with the press, and you can clean and season that spot as part of your normal maintenance.When it comes time to season it, wear a pair of disposable gloves (optional) and/or a rag or towel you don’t mind getting covered in oil. Just apply whatever seasoning oil you prefer and coat the thing. Once you’re done place it on a baking pan in the oven and heat at 375 for about an hour. I don’t recommend using paper towels due to them tending to leave remnants while applying oil.Last comment/question I hear a lot of is “does it get too hot to hold?”. It’s metal, so depending on the heat source and how long you leave it in contact, yes the handle can get toasty (welcome to the principle of thermal conductivity). In normal use, you’re not going to have a problem. It’s a LOT of metal to heat up, and those springs on the handle keep you from directly touching the handle. In normal use, it might get a little warm, but you’ll never have an issue.That’s my not-so-short review. Hope it helps! I’ve found this to be a great addition to my kitchen, both indoors and out.One last bit of advice - don’t use this with any kind of non-stick griddle or pan. This thing is cast iron and it will scratch the heck out of the non-stick surface.
E**Z
Great thoughtful construction, kitchen must have!
Lodge cast iron products are known for durability and this one will likely be never replaced!! I love that the handle construction is very sturdy and well made, and doesn’t heat up like the rest of the press... I can easily reposition without needing oven mitts. I’ve carpal tunnel and have no issue which maneuvering this over a steak or even Cuban cheese toast. The spacing for your grip in the handle is large enough not to worry about your knuckles hitting the hot area. This was very well thought out construction to a few small points that make a big difference. Cast iron always takes that extra step to wipe down with oil to clean, and this is no different. This could also be considered an inheritance piece as it’s that durable. It does it’s job very well, great weight that’s not light nor too heavy. I purchased a tomahawk steak, and those things are huge! It would not completely fit in my Lodge cast iron 12” pan as the bone sticks out, so I used this grill press and it was very much needed!! It held down enough of the steak’s angle where bone met meat so that it could cook up in the pan. Without the press, it wouldn’t have. I’ve also used on regular steaks and it provides an even cooking rate, which I love! Sometimes a pork chop or steak may bevel a bit with the sides curling but this grill press prevents that. It’s big enough for one whole avg steak, but I’ve also used across 2 steaks for a more even cook. Love this and wish I had bought it sooner! We don’t make a lot of steaks but now it’ll be a staple for when u do.
A**A
Not flat; not for smash burgers
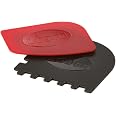
It's good quality and feels heavy enough.However, I was not aware the press had a lip to it and was not flatI brought this for making smash patties and had to return it because it was not flatWatch out if buying for smash burgers
Trustpilot
3 days ago
4 days ago
1 day ago
2 days ago