🌟 Control Your Climate, Elevate Your Space!
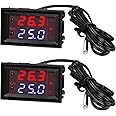
The 12V Electronic Temperature Controller is a programmable thermostat that operates within a temperature range of -50 to 110°C. It features a waterproof NTC sensor, dual color LED display, and boasts a refresh rate of 0.5 seconds, making it ideal for various applications from home automation to industrial use.


T**.
Works as expected.
I can't yet speak about the longevity of this product but I can tell you that it was very easy to integrate into the system that I was building. I did hours of testing and it worked exactly as I expected.
A**R
I N F O ... Y O U ... M U S T ... K N O W ... B E F O R E ... B U Y I N G
I purchased the same controller from 2 different sources. On one order I received the old design and on the other order I received the new design. The one I bought from (DZS Elect) was the NEW design and included an operating manual. It worked great for 3 days; but then failed and only showed LLL in the red digital display for the current temperature. I checked the probe and the wiring. The failure was internal in the controller. The NEW design controller uses surface mount rectifiers on the pc board next to the relay. Do NOT buy the new design from (DZS Elect). I bough the other controller from (Xipshow) and the controller I received was the OLD design (which is much better than the new design). The old design uses redial lead rectifiers in the pc board next to the relay. but it does not come with the operating instructions. You can get that by going on line and looking up KETOTEK Model KTF0091. It's only one page. In almost every case you can use the factory settings for operation and only change from C° to F° if that is your choice. The important point is this ----- Buy from (Xipshow) and get the OLD design. It works great with no problems.
G**
Good that they come in 2's
I got these to run cooling fans on a RF amplifier. The first one I hooked up only lasted about 5 minutes, in fact while I was programming set points it suddenly just went blank, was wired correctly, no shorts, no smoke, it was dead. So, I hooked up the second one exactly the same way and crossed my fingers. Yeah, this one works better. Another thing I didn't like is that you can only program one setting at a time and if you're too slow it goes out of program mode and you have to start all over. Other than that the one is still working fine after a week or so. As far as accuracy I'm not worried if it's a degree or two off, I just want it to work right to keep my amplifier at a decent temperature while operating. I ran a separate power supply, one for the controller and one for the fans. The power for the controller is from a regulated 12.2 volt power supply and the other for the fans comes from a regulated 24 volt power supply.
S**.
No-frills, no nonsense thermostat switches
I bought these to run the fans and water pumps in my chicken coops. The thermostat turns the fans on when the temperature gets high enough in the coop, and I have one that turns the pump on in the water tank when the temperature in the water gets low enough (to keep the water from freezing and breaking the pipes.) It’s not intuitive or easy to wire and program the thermostat, and the instructions are poorly written, but once it’s done, the thermostats work just fine.
R**R
Cheap - I knew this going in but it should at least work.
Both units I received were defective. I used a multimeter to validate. The power up and look nice and an extra light comes on when they reach the set temp but no load it passed to the load terminals.It could also be that I have a setting incorrect because there are NO directions in the box....
N**K
Controller resets repeatedly under 12V 12.5A load. Had to find programming instructions online.
The controller appears to work fine when used with a low amperage load but gets stuck repeatedly resetting when used with a higher amperage load.I purchased this controller to use in combination with a 150W ceramic heater. The electrical load of the heater is 12.5A at 12V which is well below this temperature controller's supposed maximum load of 20A at 14V. I first tried running the heater's ground directly through the controller. When the controller would close the relay, the controller would immediately turn off causing the relay to open. It would then immediately reboot and close the relay again, which would cause it to turn off again. The temperature controller stays stuck in this loop indefinitely.The controller does correctly and accurately control the heater fan (<0.5A at 12V), so the issue appears to be with running decent sized loads.I was able to get the temperature controller to control my 150W heater by connecting it to the gate of a RFP30N06LE N-Channel MOSFET and using the MOSFET to control the heater. See the attached photo of my wiring schematic.Programming the controller wasn't hard... once I found a manual. You can find it by searching for "Ketotek KTF0091". I've attached a photo of the one-page manual.I'm giving this 3 start because technically it works as intended. However, its actual load capability is substantially less that what is stated, no manual was provided, and programming it would be impossible without a manual.
I**E
Good Little on-off Temperature Controller
This unit is a good little temperature controller. Some things to know:1. Screw contacts are not labeled. Relay terminals will measure open (infinite resistance) both polarities. Module power input measures 15 Meg ohm when red multimeter lead is on positive, infinite resistance when leads reversed (series diode protedtion).2. Module requires minimum 8 volts to actuate the relay.3. Relay is rated for 10 amps AC. DC rating is generally less for a relay.4. Module default usage is for cooling. To set for heating:a. Hold top button in for 5 seconds, this gets you to P0 - P9 parameter settings.b. Use top and bottom buttons to get to P0.c. Hold the top button in, then push bottom button in for a short amount of time. Then let go of both buttons.d. When the parameter value flashes, use the top and bottom buttons to change value.5. The temperature difference value, P1, (hysterisis) can be changed by same method above.
Trustpilot
1 week ago
2 weeks ago