🔥 Ignite Your Comfort with ICM281! 🔥
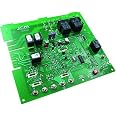
The ICM281 Furnace Control Replacement is engineered to replace OEM models, including Carrier CES0110057-xx series control boards. It operates within a voltage range of 98 to 132 VAC at 60Hz, supports a 5A ignitor, and manages a 30A cool blower with 2HP capacity, ensuring reliable performance and energy efficiency.


R**Z
Great repair part, very reasonable price.
Exactly replaces the circuit control board in our good, old Carrier high efficiency gas furnace, and it has a diagnostic LED in the event of troubles in the future. Removal and installation was easy. Skill required is basic. Instructions are quite clear. I was not able to sort out the failed component failure of the original circuit board so complete replacement was the best option. Price is so good, too.Completely satisfied. I share these photos of wiring placement and visible faults in old part for your benefit.
Z**M
Works very well!
Purchased the ICM281 CESO110057 for our Carrier 58PAV090. After 22 years of service, our Carrier furnace appeared to be down for the count. Thanks to an assortment of valuable info gathered from various forums and youtube videos, we were able to narrow the problem to a control board issue (cold solder joints) plaguing some Carrier furnaces.-Old Control Board-Basically, the furnace's hot surface ignitor (HSI) would light up fine, but for some reason the main burners wouldn't fire up and after 4 attempts it would go into "lockout" mode and shut the entire system down.We were told that we could restart/reset the system at the thermostat by turning it off and then back on, in order to get it to come out of lockout mode. Well, we discovered that the furnace could still fire up on occasion after approx 4-6 re-starts during the daytime and 9-12+ resets during the cold night. Inconsistent heat is better than no heat, well... not by much.There was only heat if you have the patience to reset it several times and each reset would take approx 5 minutes each to complete. While waiting for the new board to arrive, getting up in the middle of the night to wait for the furnace to start up after each reset was the pits. We did install a WIFI thermostat and an IP camera in order to NOT have to get up by the thermostat to reset it, but this morning it took 23 resets and there was still no heat. Didn't continue because it was time to get to work.-New control board-So this morning we get an alert saying that the control board will be delivered one day earlier. Hallelujah! Sure enough, the board arrived on the porch this evening and I quickly went to work. Unplugged the furnace, unscrewed the various covers, and pulled out the old board. Not too difficult, there are plenty of videos on youtube that give you a good idea of what to watch out for and how to do it. It sort of felt like building a PC, except I actually bothered to label all of the wires just in case I forgot where they go on the new control board.It probably took about 35 minutes of actual work, I took photos of the wiring at every step of the procedure to make sure that I didn't cross wires or leave anything off. Once complete, I double checked everything, screwed the covers back on, and then plugged in the furnace. Turned on the heat and for every second there was silence, it seemed like an eternity. Fortunately, the inducer kicked in, the ignitor started to glow, and to my surprise not long after that, the burners kicked in! What used to take about 5 minutes (x 23 attempts), now took about a minute. Saw beautiful blue gas coursing through the chambers of hte burners. Never thought I'd be that excited about gas, but after several freezing nights, it was a sight for sore eyes.Thank goodness for this new control board, what a relief and what a difference a board makes!
E**.
It worked great until…
I was pretty happy, but had secondary problem with furnace. I suspected gas valve based on error codes. I hired a repair company, but the mechanical repair guy blew 2A fuse multiple times then put in 5A fuse, shorted it out big time and fractured ed the board. That was about 1 year ago, and a cold Thanksgiving holiday. But I liked the board, instructions etc. I installed it myself and thought it worked well. The repair company replaced with OEM board. I can say the docs are better, and I’d definitely buy again.
H**O
Worked flawlessly+!!!
Replaced CES0110057-00 with ICM281 in Carrier Weathermaker 8000 series 100. It was direct replacement +LED error codes diagnostic. It immediately detected power reverse L-N. Love it. Like reported in other review, it fixed main problem of furnace needing several thermostat resets to release lockout (don’t know why happened).
D**0
Universal Part Replacement, Less expensive than HVAC Wholesaler In Town
The control board was a direct replacement for my father's Goodman furnace. As a commercial HVAC tech, I could not have replaced it at this price at the parts wholesalers in my area. As other reviewers have stated, take a photo of your current board with the wiring intact before replacing. Disconnect the power to the furnace unit. Most installers install a switch near the unit to shut off power to the furnace. If not, you will need to locate the circuit breaker. This is extremely important as you may short out the transformer or damage your thermostat. Be aware that if you have an a/c unit installed in conjuction with the furnace, the board will control the a/c unit also.If so, the power to the outside unit should be shut off also.Many systems I have encountered have the colored wiring leads swapped so if your system does not operate after installing the board, you will have to remove the thermostat from the wall without disconnecting the wires and identify the mismatched wiring. The Y (Yellow) may be have a W (White) wire attached (swapped) incorrectly which would malfunction if you tried to follow the instructions on the replacement board, If you replace each wire from the old board to the exact terminal on the new board you should not have a problem. If you have the incorrect wire colors attached to the old board (R) Red, (G) Green, (Y) Yellow, (W) White, Just attach a piece of tape to the wire and mark it with the correct letter. (The white wire may be attached to the (G) screw on the old board) mark it with a (G) and attach it to the (G) terminal on the new board. If you are not an experienced tech, I would suggest you go to an auto parts store and purchase two fuse replacements for the board. They are not carried in most hardware stores. If you accidently "short out" the wires, the fuse on the board will blow and you can replace it after correcting the problem. Keep one for spare if you have a power surge.The board is not "junk" as one reviewer mentioned and is the exact board a HVAC Tech would use to replace a Carrier or other Name Brand unit. It is just not repackaged and marked-up in price. As I mentioned earlier, it was less than half the price I would have paid at the local wholesaler for HVAC parts.
Trustpilot
1 week ago
2 days ago