💖 Elevate Your Nail Game with Kiara Sky!
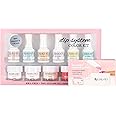
The Kiara Sky Dipping Powders Essentials Kit is a complete, easy-to-use manicure system designed for long-lasting, natural-looking nails. This cruelty-free kit features a chemical-free formula and includes exclusive limited edition colors, ensuring a stylish and healthy nail enhancement experience.
K**S
Easy to use. Beautiful results.
I really like this system. It is quick and easy, and the results are beautiful, even the first time you do it.I used it on natural nails, which tend to split and have areas of soft spots (peeled? Not sure. Maybe just old.) Don’t be put off by the number of steps—it isn’t as bad as it looks once you get started. Make sure you lightly buff the shine off your nails.The first step is just dehydrating, so you can do all nails at once. If you have attached nail extensions, you don’t put this on them, just on your natural nails.Next, you use the base, which is essentially glue to make the acrylic stick. Do one coat of natural, so the colored powder won’t stain you nails. Cover the nail with base, then gently dip at a 45 degree angle into the powder. Wiggle your finger around a bit to make sure the powder gets all over the nail, then gently remove the nail from the powder. Flick the back of you finger with your other hand to knock off the excess, and go to the next nail. Be aware that the powder is extremely fine, and when the jars are full, spilling it is inevitable. Use paper towels under the jars. After all the nails on one hand are done, you are ready for the colored powder. Again, cover the nail with base, then dip into the powder, flick off excess and move on to the next nail. Do this twice. When you are sure all the nails are “set”— a couple of minutes—take a soft brush and dust off your nails. Then do a coat of clear powder on all the nails in the same manner. This protects the color when you file them.(You can pour the powder on rather than dip, if you prefer. Pouring is best for the clear coat, so the powder doesn’t get contaminated by other colors. A pouring boc comes with the kit.)Next, use the activator to cure the nails. Slather it on to make sure it penetrates all the layers. The color will darken when it gets saturated. Let it dry (really fast) then take a nail file and smooth any bumps or thick parts, and make sure to file gently near the cuticle so there isn’t a ledge when your nails grow. There shouldn’t be a whole lot of filing needed—it goes on really smooth. When you are satisfied, rinse your hands with water or an alcohol pad, to get the dust off. Don’t use soap—you aren’t done yet and don’t want oily junk on the nails, yet.Then go over each nail again with the activator, and wipe off any excess. I use felt pads, but anything lint free is good.Do not wait too long to do the top coat, because it needs the activator to cure. It says to use quick, light strokes, but the first time I took that a bit too much to heart and it didn’t look as good as it could have. Just put it on like nail polish and you should be fine. When it dries, add another coat, let it dry for a couple of minutes, then you are ready to do your other hand.After you have finished both hands, slather on the cuticle oil and massage it in.And you are done!The other bottle is brush cleaner. I just switch out the brushes.The first time, I did red nails with gold accents. This time I did Tahitian Princess, which I highly recommend. (In picture)Soak the nail off with pure acetone. I also use the Hands Down nail wraps covered by a disposable glove to soak off, as you can still function while you wait. It took 15 minutes, and an orange stick.The finished nails are thicker than natural nails (which I want!), but not reall any thicker than a gel manicure. But it might take some getting used to. The odor is minimal. If your nails grow quickly, it will last two weeks, longer if they grow slowly. You probably could go a fill in, but I was itching to use the Tahitian Princess, so I did not try.In addition to the kit, nails files/drills are needed (180 grit files work great), a cuticle pusher/spoon, and a soft brush are needed.
M**M
Great System but Keep in Mind a Few Things...
First time user of any powdered nail system and first time user of nail tips so I was being daring by trying both at the same time. The nail system though time consuming in application is well worth the time spent. I'm almost a week of having the nails on and they look really good. I decided to change my shine for a matte look and they look just as good matted. There are a few tips that I will take into consideration the next time I use the system.Tip 1:If using tips again, I will not apply a strip of base/powder at the line where the tip meets the nail as directed in the instructions. This caused a lump in the middle of my nail bed. Instead I'll proceed with the step that says to apply base 3/4 of the way down the nail and then apply base on full nail.Tip 2:I think I may invest in a drill because there is a lot of filing and buffing of both your natural nails and the dipped nails which is taking up the bulk of the time especially if you want a really smooth shiny finish. Having a drill will also help in getting a clean finish around the cuticle area.Tip 3:I will apply the base coats as thin as possible, since there so many dip steps, the final nail can easily look thick and bulky. I'm still trying to figure out a way to cut back on at least one of the dipped steps to also eliminate some of the bulkiness.Tip 4:Powder gets everywhere so next time (although this should have been common sense for me) I will do the process over a paper towel or hand towel. I did it on my glass table and once the powder started to get on the table, the containers started to slide and I almost bumped it off the table. That's a no no for next time.Overall, I loved this product. It's like a hybrid between gel nail polish and acrylic nails. Perfect for me.
M**H
Expensive…def NOT odorless. Pretty results.
Kiara Sky Dip System - Color Kit: Clear, Natural, Prim & Proper, Super-ficial (gold glitter), and Hot Damn!This was my first and only time, so far, doing any dip powder myself. Tired of paying someone else to screw up my nails, and tick me off cuz I have to file off, reshape and reapply top coat. I’m a lil particular 😘. Only did clear and created an “apex.” Was simple to use, end product looks decent, I think, and added the much needed strength/protection for my nails.Loved the simplicity but not fan of the top coat. It dried fast and left goopy ridges. But to be fair, I’m pretty sure that was user error as I saw a video, after the fact, saying not to overlap your first layer of topcoat. Oops. After trying it twice, I ended up wiping/filing it off (twice) and applying Beetles gel glossy topcoat instead. Not so keen on the oil, either. Kinda of a strange consistency.Want to try the French one next but that is basically the same price. Could try the mini but the pots only have 1/2 ounce, or buy the powders and French dip case separately. Meh, perhaps try a different brand all together…one that’s not quite so $$$ and hopefully not so smelly.This is NOT odorless!!! Has a very strong superglue-ish smell which sucks because that’s part of the reason I purchased this expensive brand’s system. Strong odors give me headaches/sinus issues and are just unpleasant.Have had it on for less than 2 days so have no clue about the longevity of my application. However, when the salon applied it last, it seemed to be holding up pretty well…until I got hold of an e-file and 100% acetone.YouTube has amazing dip powder tutorials, which are great for newbies like me. Sip&Dip comes to mind. Not a plug, just appreciate the helpful info.
Trustpilot
1 day ago
1 month ago