🛠️ Upgrade Your Wash Game!
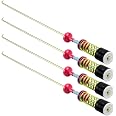
The TOMOON DC97-05280W Washer Suspension Rods are designed to stabilize your Samsung top-load washer, minimizing vibrations and preventing error codes. Made from premium stainless steel, these rods are compatible with various Samsung models and come with a 5-year warranty, ensuring long-lasting performance and peace of mind.


| Manufacturer | wsh supplier |
| Part number | DC97-05280W |
| Item Weight | 1.17 Kilograms |
| Package Dimensions | 68.71 x 9.3 x 8.51 cm; 1.17 kg |
| Item model number | DC97-05280W Washer Suspension Rod Kit |
| Color | As picture |
| Material | Stainless Steel |
| Item Package Quantity | 1 |
| Special Features | Easy to Install |
| Included components | 4 *samsung washer suspension rods DC97-05280W |
| Batteries Included? | No |
| Batteries Required? | No |
L**E
Just Order Them!
An hour of my time and the amazing price of these tension rods saved this mama A TON of money. We have a Samsung washer that has been knocking around during EVERY spin cycle and didn’t actually finish a load for over a month.We finally got someone out and they said it would be about $500 to fix and that we should probably just buy a new washer for that price.There are easy to follow videos on YouTube that make installing these a breeze. EVERY load we’ve done since replacing the tension rods HAS WORKED PERFECTLY. NO MORE DRUM KNOCKING!Absolutely would recommend.
Y**N
Calidad y Precio
Si quede satisfecha con el producto. Bien
M**N
Nice low cost solution to the "Ur" condition with these Samsung units
The Samsung WA50R5200AW/US was the washer having issue with unbalanced load. This seems to be a pretty common issue with these units when they get around 3-4 years old. There are a lot of "how to" videos online about how to fix this issue with the Samsung in general as well as other top loaders. I would point out that the specific model listed above is a bit different than most of those. I only found one video specific to this model number. A few notes below about the process.You will need a phillips head screwdriver, a smaller flat blade screwdriver for prying on some things, and probably a set adjustable pliers for the water connection. You may need a set of end snips for zip ties, or such. Get a small tupperware bowl to put your screws and such in, and I honestly recommend taking some pictures as you go just for surety. Also recommended are some junk rags and possibly some rubber gloves. You might want to have Goof Off or other solvent on hand as well.Unplug, disconnect from water, empty the basket if you haven't already, pull the drain line up. This will go well better if you can get your unit to drain. In most cases when you set to "spin only" it will try to drain at first and then will try to fill to reset the load. Just unplug before that follow up fill.There are (5) screws along the top rear panel. Remove those and pull the small connector out which is located on the right side of that panel (from the back). It is a black connector inside a grey socket. You will probably need a small flat blade screwdriver tip to do so. After this back cover is off you can push the "control" panel forward. There is one connector you have to pull loose from it. The catch for that pushes towards the connector. Set both of these pieces aside.Take off the lower back steel cover. There are (4) screws that keep that in place. On the upper back left you will see a green covered wiring harness going from the top to the bottom of the washer. There is (1) screw on the upper left area just below that and a plastic barb to hold that in place. Remove the screw and push the barb to the inside of the washer case. If you continue to follow that green wire upwards there will be a white rectangular housing with (3) screws holding it down. Remove those screws, but there is no need to open that housing. It contains capacitors and if you don't know about them, they can hurt you badly. Don't mess inside there.On the rear right, from the back of the top of the washer there is a small square grey plastic cover with a "U" in it that a couple of wires go into the lower case. Find both connections about halfway down the case and disconnect those. Remove the grey cover by sliding and pull both of those connections out the top.There are three small wires screwed to the back of the housing for grounding, remove those.At this point open the lid and use your small screwdriver to remove the rubber plugs under the front of the lid and then the (2) screws located there. Along the back of the lid are (2) more of those same screws. Once you have all those loose the lid will move. Most of the "how to" videos show you propping this up at an angle. You will find that simply placing the lid a small clockwise or counter clockwise turn will be better and allow access to all (4) of the struts. If you try to prop the lid you will have more issue and work relating to that green wire mentioned earlier that goes down to the motor and pump.You will notice that the top of each strut sits in a brace with a slot in the middle both top and bottom. Use your rag to grip the strut down a ways and pull up. Use your other hand to grab the tip of the strut as it comes up. Clear the slot and pull in towards the drum. Once the top is loose push downward to get only on the metal stem of the strut to clear the lower slot. Do these one at a time.At this point is worth mentioning that a second pair of hands could help, but are not required.These replacement struts are just barely shorter than the stock ones and the springs are a bit more firm. Put the lower spring end into the slot. You or friend have to lift up the corner you are working with, pull the rod to compress the spring and put the top back into the upper slot. The right rear strut looking from the front will have a connector to take off the rod and probably some involvement with a hose. This aspect is why I recommend taking off that rear panel.Once you have them all in, reverse the operation and put your controls and covers back on, hoses, drain, plug. When that is complete turn the unit on. Hit "Temp" and "Delay End" at the same time. A code will come up (I didn't notate what that was) then press the "Start" button. This procedure resets the X and Y axis for the tub on the new struts. It will go through a process with the flashing rectangle and spin around for a moment, then turn off. It is ready to use.Of note here: The struts are covered in grease and very stick silicone, particularly if the stock ones. Use the Goof Off or other solvent to clean the cabinet and controls and you are ready to go. I deducted one star simply for them being a different length. They work together just fine, but cannot be used as a replacement one at a time for the stock struts, which are longer.
B**A
Great part. Easy to swap out.
Only took about 20 minutes. Easy job. Saved over $250.00 doing it myself and no stinky appliance repairman smelling up my house.Great quality item. Expect them to last a long time. Installed on a rental property that I am sure the tenant abuse the machine by over loading it. Because renters don’t care
R**.
Installed a month ago and they work great!
We had a three year old machine that would spin and would fill up over and over trying to re-balance! These cured the issue. ATTENTION: View some of the YouTube videos to install these. One person can do this but it is so much easier with two people. Also when it says tape the lid shut, tape it shut! Little tips that make all the difference. If you are careful, there is no need to disconnect ALL the electronic components. Move your machine into a room where you have plenty of room for your elbows and bending into the machine. We are very pleased with these balancing rods/springs. Less than $45 and about an hour of work for two people saved us the cost of a new machine!
Trustpilot
1 month ago
3 weeks ago