


GeauxRobot BeagleBone Black Clear Compact Case
Product ID: 4180425
📏Slim 0.6-inch profile
🔧Step-by-step assembly guide
🦶Non-slip rubber feet
🔲 Clear protection, compact perfection — your BeagleBone’s new best friend!
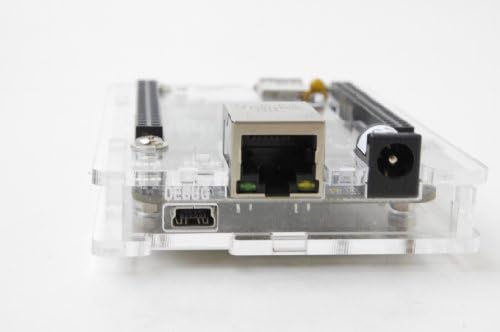
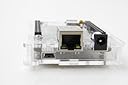
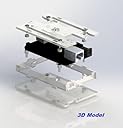
The GeauxRobot BeagleBone Black Clear Compact Case is a slim, transparent acrylic enclosure designed exclusively for the BeagleBone Black board. Weighing just 1.6 ounces and measuring 4.1 x 2.3 x 0.6 inches, it offers a secure, precision fit with easy assembly guided by step-by-step instructions. Featuring non-slip rubber feet and clear port markings, it enhances both protection and usability while maintaining a sleek, minimalist aesthetic.
| ASIN | B00FGIR11C |
| Color | clear |
| Customer Reviews | 3.9 3.9 out of 5 stars (33) |
| Date First Available | September 27, 2013 |
| Is Discontinued By Manufacturer | No |
| Item Weight | 1.6 ounces |
| Manufacturer | GeauxRobot |
| Other display features | Wireless |
| Product Dimensions | 4.1 x 2.3 x 0.6 inches |
D**F
Very nice case, but beware of small parts and sticky paper!
This is an awesome little case. I'm partial to the layered cases because of their slim profile and how they hold the board so well when you get one that fits. This one fits like a glove and holds very securely. Ports are easily accessible and I haven't found any cable of mine I can't use. The case includes rubber feet as well, which is an especially nice touch on these little systems. Anyone who has tried to plug cables into a board or had to otherwise handle a board to get things working can understand what I mean. Without rubber feet, these little cases love to walk and slide around your desktop. With the feet, it's a lot better. I just wish all cases would decide to add those in. All the ports are clearly marked. And like all other laser-cut acrylic cases out there, this one does have the sticky paper on it. It uses small buttons and insert rings (both with paper) to get things working right. Mine came with an extra ring and button, which I assume is in case you lose one. They are very small! While knives work to peel the paper, I found scraping back from the edge with a finger nail would get me enough paper to grab hold of and I could peel from there. No scratching the acrylic with a blade. I would recommend this case a lot.
S**E
Junk
Very fragile case. Attractive, but pointless if it is less protective than the bare board sitting on my desk. Get something else.
A**R
Nice case if you like puzzles.
It's a nice, slim case. It's nice that it maintains access to the buttons and GPIO connectors. My only gripe is its a bit annoying to put together. Peeling the kraft protective backing off the pieces is a pain and getting all the pieces together is a bit of a puzzle.
N**0
This was great and looks good
This was great and looks good. But the pieces come with a very thin brown paper taped to each side which must be removed before assembly. Not a big deal but it took about 10 minutes to remove all of the tape and got pretty frustrating at times. I assume there is a reason this isn't removed before shipping but it wasn't clear to me.
M**B
Assembly required, but worth it!
This requires some assembly, some nimble fingers, and removal of protective film (so don't trim your nails right before it arrives). It's fairly easy to scratch, so be careful with your tools. I realize the purpose of this is to get scratched so the board doesn't, but it looks so dang good I want it to stay clean for as long as possible. Assembly is fairly straightforward and simple. Once put together, this case is fantastic. It adequately protects the board, leaves all of the ports and inputs readily available, and looks sharp as heck. My only minor gripe is that the lip created by the "top" and "bottom" pieces of the case meeting with the end covers at the power/debug and HDMI ports made it necessary to trim my HDMI adapter down. Without trimming the lip wouldn't let my adapter seat properly.
W**L
TMW --- Too much work to put this thing together
First, let me start by saying I'll built PCs from scratch many times in the past. And I've taken laptops apart, installed wifi modules, and replaced displays. And most recently, I've moved to repairing cracked cell phones screens, so you'd think I'd be qualified to put this brain dead simple case together. Now, the end result might be worth the effort, but I may never know. Some of the parts are just too small and fragile, and trying to remove the sticky film can take 10 - 15 minutes alone. And then the spacers provided don't simply slide over the screws like they should, and so you have to screw them on with a screwdriver and pliers. But the spacers are tiny pieces of fragile acrylic and one of mine broke, and so 20 minutes into the process, I just stopped putting the thing together. Also the steps in the instructions (and there are a lot) aren't in the best order, and so the sellers recommend you use scotch tape to hold the small parts into place while you're moving on to later steps. Now, I can really appreciate the precision with which laser cutters can cut acrylic, but either the spacers should have cut larger, or they just should have been metal or nylon. Normally, a case for something like a Raspberry Pi takes 2 - 3 minutes tops to put together, but it looks like the best case assembly time for this case is at least an hour, and worst case (pug intended), like for me, maybe never. An hour of my time is worth more to me than the $10 I spent on this case, and for the $10 I won't even waste my time trying to return it; it just wouldn't be worth the gas alone.
R**R
It's great
I've had it for awhile now and it's great. The power and reset buttons could be slightly larger, but for me I hardly ever touch those buttons, so it does not matter as much. The bottom plate of the case pushes against the micro hdmi cable. I had to push down on the bottom plate in order to insert the cable all the way. The single most annoying thing is peeling the protective stickers off the tiny pieces, when you first assemble the case. Why doesn't it come with the stickers off?
Y**T
Awesome looking and performing.
I am extremely pleased with this case! The boot and reset buttons work great. The protection of the case is excellent. My HDMI cable fits perfectly. My CircuitCo RS232 Cape fits on top as one would expect. And to top it off, I appreciate the lettering on the case indicating which port is which. Just a nice touch. Some have said that assembling was a bit tricky. It wasn't for me and I have FAT fingers. Switch step 1 and 2. Use masking tape to hold the screws. Then install your switches. Don't over tighten. Finger tight is actually good. What I do think would be nice product line expansion would be taller screws and side panels to encompass the common capes.
Trustpilot
1 week ago
4 days ago