🌟 Light Up Your Life with SunBlaster!
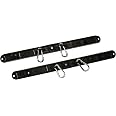
The SunBlaster Universal T5 Light Strip Hanger Accessory is designed to hold up to 7 Sun Blaster T5Ho lights, providing a flexible and efficient lighting solution for your growing area. With no assembly required, it allows for easy installation above, beside, or inside your space, making it ideal for both novice and experienced gardeners.
N**H
Five Stars
They do the job well and the price is RIGHT!
J**S
Bad quality, broke immediately
I haven't even had this 20 minutes and attempted to insert my SunBlaster T5 lamps (which was deceptively difficult) and one of the plastic tabs broke right off. I should have paid more attention to the reviews where this happened to several other people. I encourage SunBlaster to pull this product as it's not in line with the great quality of their lamps. I would have been better to make one myself using the mounting clips from my lamps, and it is probably what I'm going to do now. Also the description is incorrect and mentions 4 hangers, but it actually comes with two 7-Up hangers instead.
G**R
Nice product if you are patient
The light strip works reasonably well with a few caveats that I want to describe since my experience with the item just occurred this morning (i.e., fresh in my mind). This bracket combined with seven of the Sunblaster NanoTech lights makes for a compact, lightweight fixture, even for the 4ft bulbs. Take care to pay VERY close attention to the dimension of the bracket: even when doing so, it may end up being smaller across than you envisioned. The "bracket" is also actually composed of two separate pieces (so, bracketS) that do not connect together in any way (aside from the light fixtures that you will attach to them). This is important to an installation note that I will provide later.The daisy chaining capability of connecting up to seven lights in series is a nice feature with some caveats. First, keep in mind that the bulbs are part of the circuit that you are creating. Therefore, if you have some fixtures that don't have bulbs (as, for example, if Amazon delivered two of your seven lamps with broken bulbs), they need to be at the end of the chain. You can't put bulbs in positions 1-3 (for example), skip positions 4-5, and then put the two remaining bulbs that did not arrive broken in positions 6-7 since the final two will be separated from the circuit created by the daisy chaining because positions 4-5 have no bulbs. My suggestion: buy some extra bulbs from some source (I found them cheaper outside of Amazon) because (a) you will ultimately need them if you grow from seed every year and (b) to replace the ones that will inevitably arrive broken in shipment.If you do not want to fill every position on the brackets, you can skip positions. The cords intended for the daisy chain connections are short but they are long enough to allow skipping three positions (I just checked to confirm this). You might want to do this iif you wish to space your lights out and not populate all positions on the brackets. For example, you could put a light fixture in "position 1" then skip the next three positions putting the next fixture into "position 5".There is another caveat on setting up the daisy chain (lights connected in series) configuration. The two ends of the light fixtures are NOT identical in terms of their electric connections. One end is "male" the other is "female". If you want to use the daisy chain connecting cords (and not simply plug each individual light in separately) you have to alternate the direction of the lights on the brackets. That is to say, the "male" connector of one light fixture has to be placed next to the "female" end of the adjacent position on the bracket.The next caveat regarding installation of the light fixtures to the brackets has to do with order of addition. My trial and error suggests there is a right and wrong order in which to do this. The "correct" way is to connect each light fixture, in turn, one at a time, to BOTH brackets. That is to say, do NOT connect all the lights to one bracket then try to connect them all to the second bracket.Installing the light fixtures into the brackets presents some challenges. Here is what worked for me. I laid the brackets out on a big work area (large dining room table) with the brackets parallel to each other at a "correct" distance for the light fixture that I bought. In my case (for 4ft lights) I placed the brackets about 2.5 ft apart so that the brackets were not all the way at the end of the lights (as was shown in the picture for this item). Where you place the brackets relative to the length of the light fixtures is probably not all that important. I simply preferred to not have the full length of the lights serving as a "bridge" between the two hanging points (the brackets). So, I moved them in a bit from the ends of the lights in order to "centralize" the support a bit.Next, when attaching the lights to the brackets, work from ONE edge of the brackets toward the other. Connect each light in turn to BOTH brackets before proceeding to the next position. The point here is NOT to install both "outside" lights and work toward the middle because it will be nearly impossible to get the center light(s) installed if they are flanked on both sides by already installed lights. To state this another way, connect one of the most outside light position (let's call it position 1...they are not labeled on the brackets aside from to tell you what are actually installation positions and what are the spaces in between the positions) to both brackets. Then connect the next light to the next adjacent position on both brackets (let's call that position 2). Then move on to position 3, 4, etc., until you finally install the other (far) edge light fixture (to position "7").The reason for working in this order has to do with how the lights attach to the brackets. Essentially, there are rows of evenly spaced plastic tabs o the brackets into which the lights are "snapped". Look closely at your brackets and these tabs. The easiest way to determine what are light positions and what are the space in between is that the former are actually labeled "T5 position" (or something like that). The problem is, aside from the subtle label, the positions where the lights are to be attached look EXACTLY like the spaces in between (since the bracket is designed to evenly space the lights) with one, subtle detail. There are actually little plastic "lips" on one side of each plastic tab. These "lips" are what hold the fixtures in place after they are installed. Fixtures are to be installed in ONLY those positions that have these lips on both sides.These lips/tabs are what a lot of other customers have complained about as "flimsy" and easy to break. I did not have any such trouble with them, though that is not to say that actually snapping the lights into both brackets is easy! From my trials, the "easiest" way to do this is by angling a light fixture so that one edge sits down against the same tab on both brackets. Then push down, simultaneously with even pressure at both brackets on the other side of the fixture thereby "snapping" the second side into place. This requires a bit of force since the lips/tabs simply hold the fixtures in by pressure. The caveat here is that the light fixtures themselves are fairly "flimsy" and can probably easily be damaged. For sure, I would recommend wearing some kind of cotton gloves while doing this. The reflective "nano" surface can easily be scratched or smeared with finger oils, both of which will decrease the performance of the reflective surfaces.Once I figured these things out, it took me about 20 minutes to install all seven lamps to both fixtures. I would say this. If you are not patient, find somebody who is to put this together for you. If you prefer to "force" things, then find somebody who is a bit more delicate in his/her approach to put this together for you. It sounds like it might be easy to snap off the lips/tabs from the brackets. However, more importantly, the expensive part of the overall assembly, the lamp fixtures, are VERY fragile and great care (i.e., patience and the "right amount" of force) needs to be used or they will be damaged.
J**S
Works great
Perfect for spreading Sunblaster LEDs over seeding trays.
G**G
Broke right away
Nice idea but poor execution. The tabs for holding the light fixtures are much too rigid, they need to be more flexible. The tab broke on the first pair I installed and then the hanger is useless. Not worth the money.
K**T
Its a reasonable price which is good because I have broken a couple
Its a reasonable price which is good because I have broken a couple. But I actually like the way components can be replaced. The plastic can crack if your not very careful.
E**C
Five Stars
Great! Fast service.
C**.
Plastic clips break easily
Broke the plastic grooves that hold the lights when tried to reposition them. Cheap plastic.
TrustPilot
vor 2 Monaten
vor 1 Monat