🚀 Drive smarter, wire-free — never miss a backup moment!
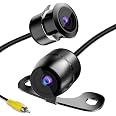
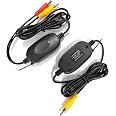
The Beastron ZBC-101 is a 2.4GHz wireless video transmitter and receiver designed to convert wired rearview cameras into wireless systems. With a robust 10-meter range and 12V power input, it delivers stable, color video transmission ideal for larger vehicles like caravans. Its compact surface mount design ensures easy installation and broad compatibility with in-car monitors and dash DVDs.


| Connector Type Used on Cable | wireless |
| Voltage | 12 Volts |
| Screen Size | 0.33 Inches |
| Compatible Devices | Monitor |
| Installation Method | Surface Mount |
| Item Dimensions L x W x H | 6"L x 2"W x 3"H |
D**S
Very nice and inexpensive wireless video connection!
I used this inexpensive item to wirelessly connect my Esky one-button camera to my Esky 4.3 inch foldable TFT LCD monitor. I installed the camera on the lower edge of the front bumper of my new Tesla model S and pointed the camera downward to enable it to view the concrete barrier that separates nose-to-nose parking slots in many shopping mall parking lots. These low-height concrete barriers are not detectable by the factory installed front sensors in the Tesla. I got tired having my wife get out of our car to indicate how close I was to the barrier while parking. Corvette and other sports car owners probably have the same problem of their low-bottom car potentially striking one of these barriers during nose-in parking.I did not want to hard-wire my front bumper mounted camera to the 4.3-inch LCD monitor I have positioned just below the 17-inch LCD screen in my Tesla. The wiring route would be tedious for me and I didn't want to possibly interfere with the side air bag mounted in the A pillar. So, before I permanently installed this wireless connection I bench tested it. I compared the image displayed on the monitor when I connected the camera to the monitor with the 18-ft video cable that came with the monitor, with the image displayed when I replaced the video cable with the wireless transmitter-receiver. Both images were excellent for my needs; I was unable to see any difference, hard-wired vs. wireless.The entire system cost me much less than $100 and the overall image performance of my concrete barrier-detecting camera is outstanding.
P**Y
You need some basic car wiring knowledge to ouse this unit.
it is fairly easy to install. I used it with an aftermarket Radio. I bought the radio wiring harness and bezel kit from Crutchfield. They had great instructions which helps with the project. this wireless unit does flicker and sometimes it drops the signal which is why I gave it a 4 maybe even a 3. I have it on a 2010 Honda CRV.
J**L
This is a great product, and I'm glad I found it
This is a great product, and I'm glad I found it. Installed in my 2002 Honda Odyssey at the same time as my rear camera and saved me a lot of time and energy from having to run the video cable from the rear of the van to the head unit. This comes with a specific transmitter, and receiver. When connected the transmitter has a blue LED when powered up. It also has a power connection that plugs into the camera power jack, so you don't need to run a separate connection for the camera power. I powered the transmitter and the camera by tying into the reverse lamp circuit, so they only come on when in reverse. The receiver has a red LED when powered up, and I tied that into the Amp remote wire on my head unit. I did not use the power antenna remote wire, as on my head unit (Sony XNV-770BT) the power ant. remote ONLY has power while in Tuner mode. If I am in any of the other modes, the power ant. circuit doesn't power on, for obvious reasons. The picture is nice and clear, and I'm very happy with this.
C**G
Installing backup camera
** Revised review 1 day later ***The transmitter started to flake out after more than 15 minutes of driving. Eventually, I removed the transmitter and ran the video hard-wire through the car and my backup camera works properly now. I would not recommend this 2.4 gHZ transmitter product.*** Original Review ***My car didn't come with a backup camera and after reading an article on how a dad ran over his kid, I decided it is really a must and did some research on installing one myself.There's a youtube video by Cars & Driver on installing a backup camera, but every car is a little different, so before buying everything, I would advise to check out your car and envision how you would put everything together. I spent $100 total make it happen:Morris Products 10772 Quick Splice Connector, Red, 22-18 Wire Range- It worked well! The difficult part is making sure the wire is in the right places before clamping down with a plier. Once all the way down, the wire is really tight in there. I used this to splice the power from one of the reverse light on the trunk.E-PRANCE New Car Door Clip Panel Audio Video Dashboard Dismantle Kits Installer Pry Tool- Could not have removed the stupid trunk lid liner without this tool and also a small flat head screw driver. The trunk lid liner is held on by 8 black plastic round clip and to remove them without breaking the plastic round clips, you need to discover where to push in with the flat head screw driver by probing under the clip. The location is found when you can stick the flat head deeper than everywhere else. The two sides are usually vertical or horizontal and once found, just shove in the screw driver and one of the very narrow but flat prong to pop it out!INNOVA 3300 Hands-free Digital Multimeter (10 MegOhm)- Had to use this to find where to get the power source for the LCD Screen. I did not like this for the car because the prong is not narrow enough to stick into really tight spot.Esky® EC170-09 Waterproof High Sensitive Color CMOS Black Aluminum Alloy Universal Car License Plate Frame Mount Rear View Backup Camera- The camera is really nice and the frame is nice too. There is are built in indicator lines for distances that's not removable. Fish eye camera lense is also really nice. My only issue is that there doesn't seem to be a way to stop the camera from freely rotating other than the wire sticking out stops it. The length of the wire is also a small issue; it was ok for my car as it's the right length to go throught the plastic of the license plate lighting fixture. But I can see it an issue if it needed to be longer.4.3 Inch LCD TFT Rearview Monitor screen for Car Backup Camera- I wish the wires coming out of the LCD Screen was much longer, but it wasn't. The picture is very accurate in its portrayal, so it's not a problem.2.4g Wireless Color Video Transmitter and Receiver for the Vehicle Backup Camera/front Car Camera- Works very well for short distance of a normal car. The transmitter heats up very fast though, and I worry it may break down with the amount of heat it produces. ... I'm scared of if and when it breaks as I don't like the idea of going back in to fix it.**** Installation on 2015 Volvo S60 ****1) 20 minutes just trying to get the trunk lid liner off. The black clips were really hard to remove, but once I figured it out, it was just a process of getting to the side of the clips and pushing in the right way. There is also the trunk latch plastic cup thing that pulls right off. A trunk holder thing that has two plastic clips that needed a good push from the back side that I didn't do appropriately (and broke the clip). A trunk release handle that is attached to a steel cable that needed some finessing to remove.2) 10 minutes on unscrewing the license plate lighting fixture. I needed some special Torx screw driver and it was almost not the right size. Eventually, it came out easily when the screws were all out.3) 30 minutes to connecting the *RIGHT* 2.4 ghz transmitter to the license plate camera and stuff it in the space inside the trunk. What's nice is the transmitter has the plugs to power the camera and to receive the 1 yellow RCA feed. So, I had to thread the transmitter cable into the trunk through the license plate lighting fixture. Then, to power the transmitter, I found the red/black wire for the reverse light on the left side of the trunk lid. My wife had to come to put car in reverse for me to verify the right cables to use. I used the splice things to splice the cables together, very fast!4) For the front, I stuck the LCD screen to the dash, ran the cable on the side, and connected the power lines together with a cigarette lighter car adapter. I utilized an old cigarette car adapter that I wasn't using anymore, cut the wires, stripped, and lashed it all together.Now, I have a backup camera for just about $100!
M**E
Super easy to install, way too much static
Installed these so I didn't have to tear apart the interior of my car. They work, however there was a ton of static. I adjusted the placement and it helped (get them away from all electric sources and metal) In the end, I added a coil of wire and made new antenna to try and get the placement more line of site and away from metal and electric sources. This helped so much and almost stopped the static on the picture.It was weird when static would pop on the screen and go. It felt like everything out there wants to disrupt this signal.It does work 100% of the time, the static on the screen drove me nuts and I ended up just running a cable to the camera.If I were to do this again, I would get the 5g units, and the digital ones! They are much more expensive, but I'm sure they work so much better. For my use these just didn't work. If you were going to put this in a trailer or some other use that wasn't daily this is a cheap way to add a camera.
TrustPilot
vor 1 Tag
vor 2 Wochen