
Laden Sie die App herunter


Kundenbetreuung

Desert Online General Trading LLC
Warehouse # 7, 4th Street, Umm Ramool, Dubai, 30183, Dubai
Laden Sie die App herunter
Kundenbetreuung
Desert Online General Trading LLC
Warehouse # 7, 4th Street, Umm Ramool, Dubai, 30183, Dubai


🔧 Elevate your kitchen game with a sleek built-in upgrade!
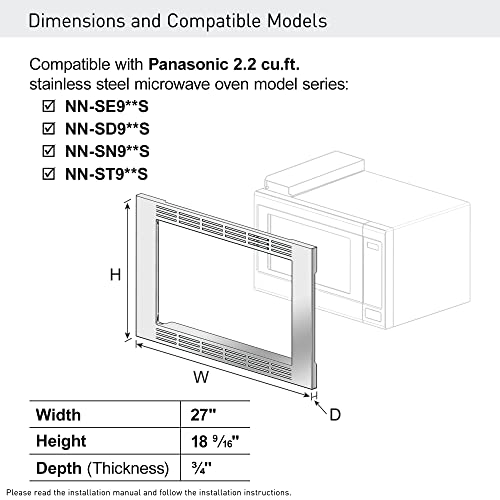
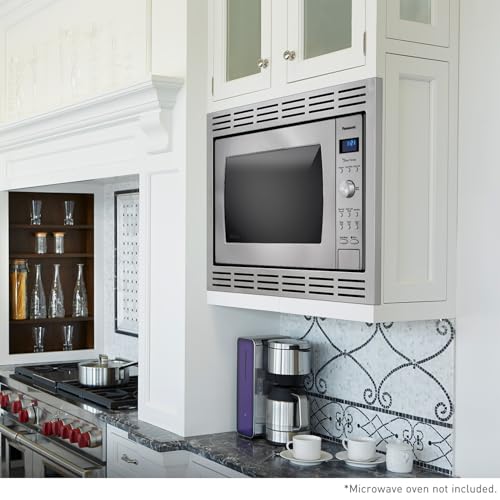
The Panasonic NN-TK922SS 27-inch Trim Kit is a stainless steel accessory designed to convert compatible 2.2 cu ft Panasonic countertop microwaves into built-in units. Featuring precise dimensions for a perfect fit, it includes a trim frame and ducting for seamless cabinet integration. Lightweight and easy to install with basic tools, this trim kit enhances kitchen aesthetics while saving countertop space.
| ASIN | B008D2TZ44 |
| Batteries Included? | No |
| Batteries Required? | No |
| Best Sellers Rank | #501,408 in Home & Kitchen ( See Top 100 in Home & Kitchen ) #858 in Microwave Oven Parts & Accessories |
| Brand Name | Panasonic |
| Capacity | 2.2 Cubic Feet |
| Color | Stainless Steel |
| Customer Reviews | 3.8 3.8 out of 5 stars (653) |
| Date First Available | June 3, 2012 |
| Defrost | Manual Defrost |
| Included Components | Trim Kit |
| Inner Material Type | Stainless Steel |
| Installation Type | Built-In |
| Is Discontinued By Manufacturer | No |
| Item Weight | 8.6 Pounds |
| Item model number | NN-TK922SS |
| Material Type | Stainless Steel |
| Model Info | NN-TK922SS |
| Oven Cooking Mode | electromagnetic radiation |
| Part Number | NN-TK922SS |
| Product Dimensions | 0.79 x 27 x 18.6 inches |
| Special Features | Lightweight |
| Wattage | 120 watts |
P**S
Looks Great - Sketchy Instructions
I give 5 stars for the finished product. But the instructions were sketchy and the installation was a challenge. This trim kit is designed to fit the Panasonic NN-SN9665 microwave. Be SURE you match the right serial numbers of the microwave and the trim kit - a number of customers complained about mismatches. My biggest complaint is the pathetic attempt to save a buck by having the customer bend a flat piece of sheet metal into the shape of a vent and attach it to the oven. The bend lines are identified by perforations but you can easily bend them the wrong way, creating a vent that doesn’t fit! Yep, I did that and had to rebend the thing into the right shape hoping it wouldn’t break because the 180-degree stress. Then you are instructed to tape…yes tape the flanges of the vent to the microwave! No tape provided, so I tried electrical tape which I could see was inadequate so then used strapping tape. Conquered. But we’re not done with this vent yet. As we (it took two of us) tried to plug in and get the unit into the cabinet opening (exactly 27”x17-3/8” as instructed) that dad gum vent got in the way! Fortunately the interior space was bigger than the cut-out opening so we were able to wedge the left side of the unit to get it in and onto the kit platform. Another half inch added to the height dimension would be tempting, but then the corner brackets wouldn’t fit right for the trim piece! I recommend bending that vent flatter. It’s just taped anyway with one screw in the back. Final look - fantastic! Matches our gas oven perfectly. I suppose that vent does it’s job but I hope the engineers would do a better job on new iterations of that stupid vent! We have a much larger cavity than the opening and I was tempted to leave it off - it probably would have been fine. But a tight fit could be a problem with heat and moisture. All said it looks great!
G**F
Expensive for what it is, terrible instructions, and difficult to install.
This is a VERY expensive piece of trim, that leaves quite a bit of space around the microwave and uses plastic clips to hold to the cabinetry. Because of this, there is almost no flexibility on the install, and you need to make absolutely sure your cabinet is to the letter to use it. Because this microwave was replacing an older microwave, while the new microwave was nearly exactly the same size as the old one, the cabinet needed to be almost 2 inches wider JUST because of the trim piece. Unlike some older trim kits there is nothing that is screwed into your microwave- the feet nest into the metal tray you put into the cabinet- so we'll see how it holds up. For being almost as expensive as the microwave, it was surprisingly janky. Make absolutely sure you have the right trim piece for your microwave and the correct size for your cabinet or you will be in for an unpleasant day. While it looks okay once in, the cost for value, difficult to understand instructions, and very large cabinet relative to the microwave this requires are all good reasons to give this (and the microwave it fits!) a pass if you can find something else.
J**A
Looks great
Once I got over the fact that the trim kit costs as much as the microwave, I finally took the plunge and bought this. And I’m glad I did. Mine was going into a cabinet that would need modification anyway, so I wasn’t very concerned about the non-standard cabinet size. I thought the directions were pretty clear, the materials were good quality and packaged well. The complaint about installing the upper left bracket and then trying to fit the microwave in the cabinet is valid. If your opening is cut to the recommended dimensions, the microwave won’t fit in the cabinet with the bracket installed. So I just installed the bracket after I put the microwave in and used a ratchet with a Phillips head to install bracket with pre-drilled holes (it’s a tight fit). Modifying the cabinet was the longest part, but I knew I was going to do that anyway. Because of that, it took me a day to make the necessary cuts, refinish the cabinet surface, and install the trim kit. But once your cabinet is prepared the trim kit install would probably take 30 minutes to an hour, so very simple. The finished product looks great. If you have the space and want a high-end look in your kitchen, then I recommend.
R**N
SOLVING THE MICROWAVE INSALLATION PROBLEM
While this trim kit looks good after it is installed, the installation is very difficult; because, it is a poorly designed product. As the trim kit instructions indicate, you are to assemble an aluminum vent that is to be attached to the microwave. Assembling the vent is relatively simple. A single piece of aluminum must be bent at predetermined angles to do that. There is a hole in the aluminum that is to be aligned with a screw in the back of the microwave. You are to remove the screw, align the hole in the aluminum with the screw hole in the microwave and replace the screw through the aluminum hole into the microwave hole. After you do this the microwave with the attached aluminum vent will not fit into the wall because of a fixture you have attached to the upper left corner of the cavity in the wall where you want to place the microwave. There are 4 fixtures, one in each corner that you must attach to the inside of the cavity corners. The trim kit face is supposed to be attached to these fixtures after you have placed the microwave into the wall cavity. The problem exists because the aluminum vent does not butt against the left side (as you face the microwave) of the microwave as tightly as necessary making the microwave with the attached aluminum vent to wide to slide by the fixture into the wall cavity. The solution is to not use the hole in the aluminum vent as the screw hole. You must drill a new hole in the aluminum about a quarter of an inch to the left of the existing hole. You can determine exactly where to drill the new hold by pulling the aluminum vent tightly against the left side of the microwave.. This will move the existing hole to the left of the screw hole. Mark the aluminum with a marker where the screw hole is. Drill the new hole and insert the screw through the hole into the microwave. Fix the rest of the aluminum vent to the microwave according to the instructions and you should then be able to slide the microwave with the attached vent into the wall cavity. Good luck!
J**E
Produit conforme à ce qui était montré. Livraison rapide et sans problème. Colis bien emballé. Pas facile d'installation car instructions pas assez détaillées. Vous devez avoir les dimensions exactes pour un fini parfait. Très, très beau autour de mon micro-onde Panasonic. Il a fallu beaucoup de patience pour l'installer mais le résultat est super !! Très contente de mon achat. Prix est de quelques dollars de moins que dans les magasins mais la livraison est plus rapide.
S**L
This very nice trim for my microwave did not fit. I returned it to Amazon 2 weeks ago (September 17/20) but have not been refunded. My new microwave oven from Amazon is fine and it is installed here in my kitchen. However, the communication from Amazon shows that I have returned IT. Please remedy this situation, Amazon, and refund to me the cost of tje microwave trim kit which I HAVE returned.
K**P
This is probably a good option if you are doing a new kitchen build, buy the microwave and trim kit in advance, and then order your cabinets after you read the instructions for the trim kit. Otherwise, expect a challenge as others have mentioned. I was replacing a microwave and trim kit in an existing 27" cabinet and while the width was correct, you need exactly 17 3/8" height between the bottom shelf and the top one to mount the brackets. Once you install the brackets, don't expect to just slide that microwave in. you're going to need to remove that top left one to cram it in with the extra exhaust vent you need to attach to the top of the microwave and remount the bracket last. Overall it works, just a bit of challenge if you don't have a lot of tools.
C**G
hard to install
C**A
Very good looking… expensive for sure. We needed it.
TrustPilot
vor 4 Tagen
vor 2 Wochen