We remain fully operational. Our teams are working around the clock to ensure your deliveries continue safely.

Laden Sie die App herunter


Kundendienst
Copyright © 2025 Desertcart Holdings Limited
Laden Sie die App herunter


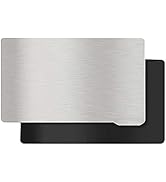
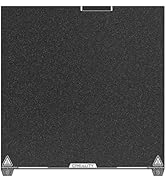
🖨️ Flex, Snap, Print: The Ultimate Build Plate Upgrade You Didn’t Know You Needed!
The KOYOFEI 2PCS 3D Printer Platform set for Elegoo Mars 3 features a precision CNC-machined flexible stainless steel plate paired with a strong magnetic base. Sized at 150x95mm with 2.7mm thickness, it offers superior adhesion, easy print removal, and quick installation via a unique handle design. Durable and reusable, it requires simple maintenance and re-leveling for flawless, professional-grade resin prints every time.


| ASIN | B0B1D9YYZ1 |
| Batteries Required? | No |
| Batteries included? | No |
| Best Sellers Rank | 9,476 in Business, Industry & Science ( See Top 100 in Business, Industry & Science ) 635 in 3D Printer Accessories |
| Colour | Silver |
| Customer Reviews | 4.0 4.0 out of 5 stars (897) |
| Date First Available | 24 May 2022 |
| Item Package Quantity | 1 |
| Item Weight | 410 g |
| Item model number | KYF-3D-111 |
| Manufacturer | KOYOFEI |
| Material | Steel |
| Package Dimensions | 25 x 15.7 x 1 cm; 410 g |
| Part number | KYF-3D-111 |
| Size | 150x95mm |
P**R
Best accessory for the Saturn
Best accessory you can get for the Saturn printer. So much easier than manipulating the heavy build plate. Now I only need to remove the plate when tilting it to let resin drip off more effectively. I put the plate back on the printer after 15 minutes or so then peel off the stainless steel sheet. Easy to use, wash and prints come off really easy yet they are firmly attached to the sheet until flexed. Well made and fits perfectly. Just watch your fingers when snapping it back onto the build plate! Very highly recommended. Just make sure you get the right size.
P**R
Fresh prints easy off
I wish these came with the printer bet thing I got easy to remove and get of fresh prints
C**D
Prepare to have to modify your printer for this to fit...
So, first, the good: - The 3M adhesive appears to be genuine and provided you leave it 48hr in a vice, the magnetic base adheres to the build plate - The sizing is good for the Phrozen 8K Mini. Not absolutely perfect, but good enough that if fitted correctly, the removal tab won't foul the sidewall of the resin vat. - The strength of the magnet is just right. Nice and strong; it's early days for me using this, but between this strength and the relatively small build plate, I'm fairly confident it won't suffer the lateral movement mid-print that plagues similar solutions on larger printers. - The Spring Steel Flexible plate is good. Again, not perfect, but good. The edges are not sharp, there's no evidence of burrs/similar that need to be removed. Now, the reason why it's 2 stars: - The magnetic layer is *much* too thick. Even on an otherwise completely stock printer with no other modifications, this uses up *more* than 'all the available' vertical adjustment on the build head. Annoyingly (not this product's 'fault', but it made it even harder to diagnose), for me, the z-axis calibration with a single piece of paper still worked as usual after fitment of this Flex Build Plate. The bed sensor got triggered as usual. Then, you go to print for real with the resin tank in place and the bed sensor *doesn't* get triggered. Meaning the build plate continues to grind downward, potentially damaging your screen and/or burning out your printer's motor. Not good. The problem is that the Flex Plate it uses up every last micron of adjustment. Yet, the FET in the base of the resin tank is fractionally thicker than a single sheet of A4 paper. So, the paper test makes you think all is fine, but when the Resin tank is in and filled with resin, it is fractionally too thick. The 'Fix': Twenty minutes of *very* carefully filing the holes shown in the attached image, then studiously cleaning all swarf off with alcohol, then re-assembling everything, re-calibrate and it all works. Yet, it's a pretty bad 'fix'. Whilst it now at least works: - There's still no adjustment left. Temperature changes alone could easily move this outside tolerances. - Replacing the FET with a fractionally thicker replacement FET/nFET, or using slightly heavier resin and you'd be back to it not working. - Adding a screen protector (a sensible mod and common mod on the Mini 8K) would further decrease the available Z-axis space and compound the problem. Yes, you could *further* file out the holes in the diagram above even deeper to restore more adjustment to accommodate the above, but doing so would further weaken/destabilise the vertical arms where these holes are and at least theoretically, would decrease print quality. Another alternative fix I could potentially see (but have not yet tried) would be to modify the printer's bed sensor so that it is ~1-1.5mm higher and so kicks in sooner. Request to makers of the Flex Build Plate: - Use a ~1-1.5mm thinner magnet. - Even then, warn users in the instructions and item description wherever it is for sale, that if they have also used screen protectors, etc. they might need to perform the above fix. Request to makers of the Phrozen Mini 8K: On the one hand, once users are modifying your product, all bets are off and it's on them. On the other... Wherever there is adjustment in engineering, unless there is a clear tendency to travel in one direction (opening up, or closing up); you try to make it so the adjustment ships dead centre. All popular modifications to the Mini 8K, however, decrease z-axis space. IE we can identify that have a tendency for them to 'close up' as they are modified. So, design the space for the hole I'm proposing modifying above, to be sited so there is only 25% adjustment in the direction of 'opening up', but put the other 75% adjustment available in the direction of 'opening up' (existing hole sizes would probably be fine, if this was done). This way, after the common mods are done, there will still be some adjustment available in either direction. I hope that this helps someone else and saves someone else hours of head scratching, investigation and emptying/cleaning the resin vat unnecessarily! :-) ----Update---- Rating now downgraded to one star. After only 50 hours of use... I noticed a strange bulge in one of my prints. On closer inspection, the magnetic layer was coming away from the base plate. The adhesive failed. Resin had gotten in behind it. Peeling the flex plate off, the magnetic layer came away (see photo above). Yes, I followed all the instructions and left it in a large desk vice for 72 hours to 'set' before using it. Now trying again with the second adhesive magnetic sheet; this time, leaving it for a week, before using it. If the second one fails inside of six months, they're going back.
A**W
A quality of.life product for resin printers.
After attaching this to my mars 4 ultra I had to modify the the z axis prong on the build plate arm so the machine could be properly leveled as the original prong isnt long enough. But after that works flawlessly I haven't had to grab the scraper since!
G**.
great value - exactly as described
great value - exactly as described
J**Z
Worked!
After reading a ton of reviews and tutorials I decided to give it a try, because scraping has been an absolutely nightmare for me. I use an Elegoo Mars 4. The set up was not easy (it's the understanding part which was hard), but still a lot easier than scraping. Basically 3 things; 1, Insert a spacer for the Z sensor. It can be anything that's between 2.6-2.8mm thickness. I laser cut it out of a 2.7mm sheet. 2, Relevel the build plate. 3, Sand the steel plate surface. Then follow the instructions with the magnet and it's good to go. First print success! 5 stars for now, but will update as soon as anything (adhesion, magnet, print) falls off.
K**R
Sand it and it works
Needs a rub down with some sandpaper to get prints to stick, but after that works fine.
A**3
Fantastic update for my printer
Seems to be holding up well, I wasn't sure how the maginetc plate would react with the resin but it's been ok so far. Only thing to note is that I had to add a 2mm spacer on my limit switch as the printer couldn't home due to the extra thickness on the bed.
B**N
The magnetic build plate is a helpful addition to my resin 3D printer, making print removal easier. It occasionally faces adhesion challenges with larger prints, but it's a solid choice overall, earning 4/5 stars.
J**S
Sí lo dejas secar un día entero, aguanta sin despegarse, y la potencia del imán es muy fuerte, en 7 impresiones todo perfecto
O**A
There are 2 items for this price
A**X
The magnetic build plates themselves were pretty good, but unfortunately I couldn't get my mars 4 ultra to accept the new z axis=0 and it always tried to press down to far onto the screen. I did try to level my build plate manually, but because I was doing it without the help of the z axis=0, it only printed on one side. The side it did print on had pretty good prints, though. And easy to pop off.
D**Y
I am using this on my Mono M7 in order to pull prints off the build plate easier. While it does appear to be more cleaning (of the metal plate each print so you can put it back on), having 2 significantly improves my work flow. I wish I could buy the plates themselves without the magnet as you only need one magnet to attach to the build plate. I did need to adjust the magnet when I was attaching it originally and it was HOT so I was able to manipulate it slightly to get a perfect fit, but definitely be cautious about getting the edges right when you first attach it. You will need to wait 24 hours after attaching the magnet before printing (it only tells you this in the instructions and doesn't seem to be posted elsewhere). Be careful of splatters as they do snap to the magnet strongly when you are between prints. Overall, definitely an improvement for making resin printing easier and more accessible.
TrustPilot
vor 1 Monat
vor 1 Tag