Desert Online General Trading LLC
Dubai, United Arab Emirates
Desert Online General Trading LLC
Dubai, United Arab Emirates


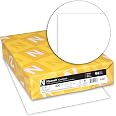
📑 Duplicate with distinction—because your paperwork deserves the best!
This 250-set pack of Appleton NCR 2-part carbonless paper offers high-quality, collated white and canary sheets in letter size (8.5 x 11 inches). Made in the USA with a bright, coated finish, it’s engineered for flawless performance across laser, inkjet, and copier devices—ideal for professionals who demand reliable, efficient multi-part forms.
| Manufacturer | Appleton |
| Brand | NCR |
| Item Weight | 3 pounds |
| Product Dimensions | 11.05 x 8.55 x 2.25 inches |
| Item model number | 5887 |
| Is Discontinued By Manufacturer | No |
| Color | White |
| Grade | A |
| Number of Items | 1 |
| Sheet Size | 8.5 x 11, Letter Size |
| Brightness Rating | 95 |
| Paper Weight | 20 |
| Paper Finish | Coated |
| Manufacturer Part Number | 5887 |
TrustPilot
vor 2 Wochen
vor 5 Tagen
vor 5 Tagen
vor 2 Monaten