✨ Upgrade your backsplash game with zero fuss! 🛠️
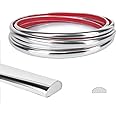
Art3d’s 100-piece peel-and-stick stainless steel backsplash tiles offer a sleek, brushed metal finish with easy, grout-free installation. Covering 12.5 square feet, these durable, heat- and splash-resistant tiles are perfect for modern kitchen and bathroom upgrades, delivering professional style without the mess.
Brand | Art3d |
Material | Metal |
Size | 100 tiles |
Color | Stainless |
Finish Type | Brushed |
Style | Stainless Steel Aluminium |
Installation Type | Peel and Stick |
Product Dimensions | 6"L x 3"W |
Pattern | Subway Stainless Steel Aluminium |
Item Weight | 0.88 Pounds |
Shape | Rectangular |
Item Thickness | 0.15 Inches |
Edge Style | Square Edge |
Unit Count | 12.5 Sq Ft |
Item Display Dimensions | 6 x 3 x 0.15 inches |
Recommended Uses For Product | Kitchen, Bathroom |
Coverage | 12 square feet |
Form Factor | Rectangular Plate |
Water Resistance Level | Water Resistant |
Special Feature | Scratch Resistant, Splash Resistant, Heat Resistant |
Manufacturer | Art3d |
Part Number | A16020P100 |
Item Weight | 14.1 ounces |
Country of Origin | China |
Item model number | A16020P100 |
Finish | Brushed |
Item Package Quantity | 100 |
Number Of Pieces | 100 |
Special Features | Scratch Resistant, Splash Resistant, Heat Resistant |
Batteries Included? | No |
Batteries Required? | No |
Warranty Description | 2-year warranty |
T**T
Cute!
I used them in a non-traditional fashion! 😆 They were perfect for using on a tall cabinet in my kitchen to accent my stainless appliances. It was my first time using them and cutting them, so some edges may look a bit obscure. Overall, they worked well for me. As always, with self stick items, I always use an additional spray adhesive for extra hold!
J**Y
Love these
Who ever made these there genius live them purchased 2 did back drop in kitchen. Live it
P**B
Very good value
I'm in the middle of my 1st time use. There's some key things to know, and some easy mistakes to make that need to be avoided.Out of the box take 1 sheet of 8 tiles and after pulling on the sheet edges to create a space in between the tiles carefully cut the plastic in between the tiles to separate them. (see pic) Warning: you should use high quality new blades in a solid box cutter / utility knife. Don't touch the tile surfaces with the knife as they're easy to scratch. Leave the protective plastic on each tile until installing each one. Make sure the surfaces where the tiles we be installed are clean and smooth. Measure and mark level lines on the wall to start. Caveat: You get one shot at sticking these tiles up so do everything you can think of before starting to put them up. I tried taking one off and it wrecked the tile and peeled off chunks of the sheet rock paper. You'll note that most tiles have a few small imperfections (dimples). I guess you get what you pay for. CUTTING: This is surprisingly easy. Use a clamp (pic) so tile won't move. Use a good amount of pressure to score the tile FROM THE BACK! You will only need to score the tile once through the foam side when it's done well. Making more than one scoring line can screw things up more than help. Keeping the score line straight is essential. If it is not, don't use the tile unless you have to and then use it in a low visibility area because any tile next to it will have a small gap. After scoring grab the tile with both hands and firmly snap it. You will be looking at foam side while snapping the two sides of the tile away from you. I was amazed at how easy and consistent this important step wasOnce ready to install a tile take the protective plastic off first then then adhesive side plastic off. Carefully line up one of the long edges and gently flatten the edge as snug as you can against its adjacent tile edge. Then flatten out tile pushing firmly. Make sure it is going to be properly placed before laying it. Tile removal is not a good option. I highly recommend starting in the least visible site. This way hopefully no one will notice your learning curve.I didn't give 5 stars because 1. Imperfections, 2. Inadequate instructions 3. Tiles virtually unremovable without causing more damage than it's worth.
S**6
These are excellent.
The texture is nice and the adhesion is superb.
D**R
Buyer Beware
Do not buy this product. It is very inferior and cheap. There are glue bumps throughout all of the panels and when I spoke with the company regarding a refund, they only offered a partial. Not only do I find this to be extremely unsatisfactory but I have to rip all of this out And find an immediate replacement due to the fact that it will rip all the paper off the wall from the Sheetrock. I would stay away from this product unless you just don’t care how it looks.
E**T
Quick, cheap, and good looking backsplash/tiles
Important: prep the wall. Sand off as much of the texture as you can, wipe the dust off. Stick on as many tiles as you can at once, if doing corner aligned pattern like my backsplash (looks good in a small area, like behind the oven) you can leave all the tiles on the clear sheet.Make sure to start somewhere you can make them level. See my photos. I accidentally let some of the tiles on the right drop and left a small gap. I haven't decided if I will fix it or not. Set them in place very lightly, adjust, then press them hard to make them stick (semi permanent.I also recommend the same company's trim. In the photo you see the stainless steel trim. The trim and tiles are not metal, but look close enough. Again, my review for these are based on price and ease of install. Real tiles are certainly better, but take longer than the 30 min it took me to do this. Peel the sheet off after on the wall, but make sure not to get it under other tiles.This project started because my new oven doesn't have a back so needed the backsplash to fill the gap. My only complaint with the tile is it is easy to damage. Be careful not to pinch itself on the sheets and damage the edges (the sheets fold between tiles).
J**Y
Looks nice, not easy to work with
Looks nice once installed. Extremely hard to remove if it sticks to the wall at all if you make an error. Oscillating tool was the best way to cut these copper tiles for me but being very careful and slow with a hacksaw works as well. Easy to damage/scratch while cutting so account for errors and buy more than you think you’ll need.
TrustPilot
vor 1 Monat
vor 1 Monat